Response clarity
Clear support communication for setup and ongoing service questions.
Everything you need for setup, troubleshooting, latency expectations, and billing confidence.
Clear support communication for setup and ongoing service questions.
Jamulus is latency-sensitive. Region selection and network quality matter.
If your group is not satisfied after setup/testing, we provide a full refund.
A clean, reliable client setup for low-friction rehearsals — curated by JamBetter.
We publish this as a tested build profile (not a shopping cart). Equivalent components are fine if specs match.
Preconfigured SD card service: We can supply a ready-to-boot Pi SD card for $25 (shipping included).
DIY option: Prefer to flash it yourself? Download the current Pi image below:
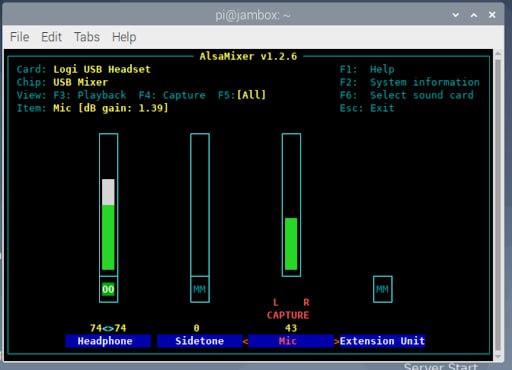
Hot microphones are a top cause of distortion and harsh audio in Jamulus. If your input gain is too high, the signal clips before Jamulus can process it cleanly.
Recommendation: keep hardware mic gain conservative (around the mid-40s on many USB headsets) and adjust from there.
On Raspberry Pi, open Terminal (desktop or top bar), then run:
alsamixer
If you are not on a Raspberry Pi, search device-specific instructions for adjusting input gain. A practical option is to ask gemini.google.com how to change attached microphone input gain on your device.
Key point: Nothing you do inside the Jamulus client will change hardware mic gain.
We deploy in the closest practical region and retune/reposition if needed.
N. Virginia, Ohio, Oregon, London, Frankfurt, Paris, Toronto, Mumbai, Singapore, Sydney, Tokyo.
Your group gets a private dedicated instance and stable settings for consistent rehearsals.
No. JamBetter handles setup and tuning so your team can focus on music.
Most groups can be live within 24–48 hours after intake details are confirmed.
Replay a prior JamBetter session or upload your own audio file. Recordings include backing-track support for practice workflows.
2/4, 3/4, 4/4, 6/8, 12/8 with beat emphasis.
Yes. Every session includes RPP and LOF files for fast post-session review/editing.
New to Jamulus? The official getting-started guide is an excellent baseline:
Jamulus Official Getting Started Guide
Use this with JamBetter setup support for the fastest path to clean, low-latency rehearsals.
Submit your setup request and include your group + timezone so we can provision quickly.